Advansta provides products for every step of protein analysis by Western blotting, from electrophoresis to immunodetection
-
Step One: Sample Preparation
Proper sample preparation is essential to a successful Western blot. For most starting materials, proteins are first extracted using chemical and/or mechanical means. The method chosen will depend on the type of sample, the subcellular location of the protein, and the conditions required by the antibody to recognize its epitope. The use of mechanical methods is often required to disrupt the complex matrix of plant and animal samples. Mechanical disruption can be followed by cellular lysis using a buffer containing detergent to further enrich the protein of interest within the extract. Frequently, cultured cells can be ruptured using a detergent buffer without mechanical methods.
When cells rupture, protease enzymes are released that can degrade the protein of interest. Therefore, it is important to prevent protease activity during sample preparation. The following strategy will help prevent protein degradation:
- Avoid excessive freeze/thaw cycles of samples.
- Work quickly and keep samples cold during protein extraction procedures.
- Add protease inhibitors (available individually or in mixtures) to the lysis buffer.
In addition to protease activity, it may also be desirable to reduce phosphatase activity, particularly when studying protein phosphorylation.

-
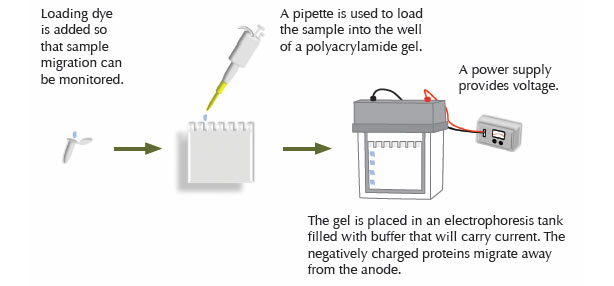
Step Two: Electrophoresis
The proteins in the extract are separated according to size via electrophoresis. A gel is prepared by the polymerization of bisacrylamide and acrylamide. Sodium dodecyl sulfate (SDS) added to the gel binds proteins, giving each a negative charge proportional to its mass. A current through the gel causes the proteins to migrate through the gel. The rate of migration degree of resolution by mass will depend on the degree of crosslinking within the gel matrix.
Once protein samples are obtained, they can be frozen for future use, being careful to avoid multiple freeze/thaw cycles. Alternatively, samples can be immediately combined with sample loading buffer and loaded onto a gel for electrophoresis. The components of the loading buffer will vary, depending on the desired sample conditions. If non-denaturing and/or non-reducing conditions are needed, SDS and beta mercaptoethanol or dithiothreitol (DTT) are omitted. Prior to loading on the gel, samples are boiled (95 °C for 5–10 minutes), to ensure that denaturation/ reduction is complete. Under non-reducing/ denaturing conditions, the samples are not boiled.
-
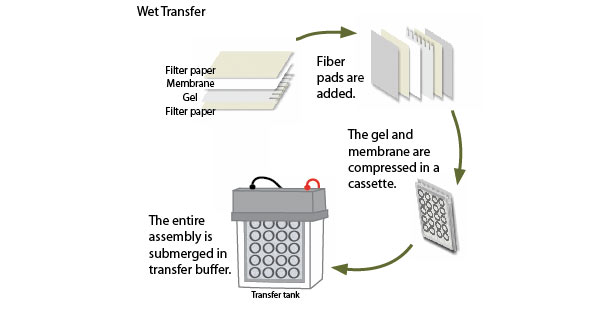
Step Three: Blotting
Once protein separation is complete, the proteins are transferred electrophoretically to a solid membrane support. The choice of membrane depends in part on the size of the protein to be analyzed, and the method of detection that will be employed. If fluorescent detection will be used, for example, then membranes with low autofluorescence may be chosen. Transfer can be conducted by either wet or semi-dry methods.
-
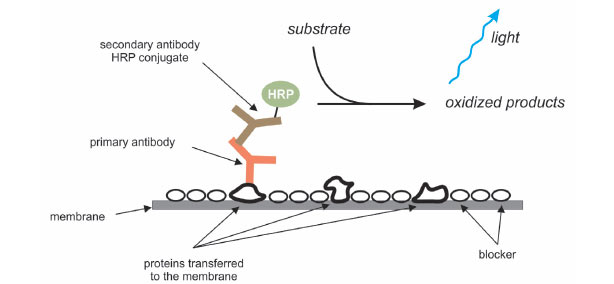
Step Four: Antibody Hybridization
An antibody that specifically binds to the protein of interest is used to detect the protein immobilized on the membrane. First, the membrane is incubated in a blocking solution to mask any sites that might interact nonspecifically with the antibody. The protein of interest may be detected by using a labeled antibody that binds to the protein directly, but usually an unlabeled antibody (the primary antibody) binds to the protein of interest, and then that primary antibody is detected using a labeled secondary antibody. The membrane is incubated with a solution containing the primary antibody, followed by washing steps to remove any nonspecifically bound antibody. Then, the membrane is incubated in a solution containing the labeled secondary antibody, followed by additional wash steps to remove any nonspecifically bound antibody.

-
Step Five: Detection
After the final wash, the location of the protein of interest is visualized. If the secondary antibody was labeled with a fluorophore, the membrane can be imaged using a fluorescence imaging system with excitation and emission wavelengths compatible with the fluorophore used. An advantage of fluorescent detection is that two or more proteins can be detected on a single blot by using fluorophores with nonoverlapping excitation and emission spectra. Commonly, the secondary antibody is conjugated to horseradish peroxidase (HRP), an enzyme that can convert certain substrates into chemiluminescent products. For chemiluminescent detection, the blot is incubated with a solution containing the HRP substrate, and the resultant light detected using film or a digital imaging system.